Table of Contents
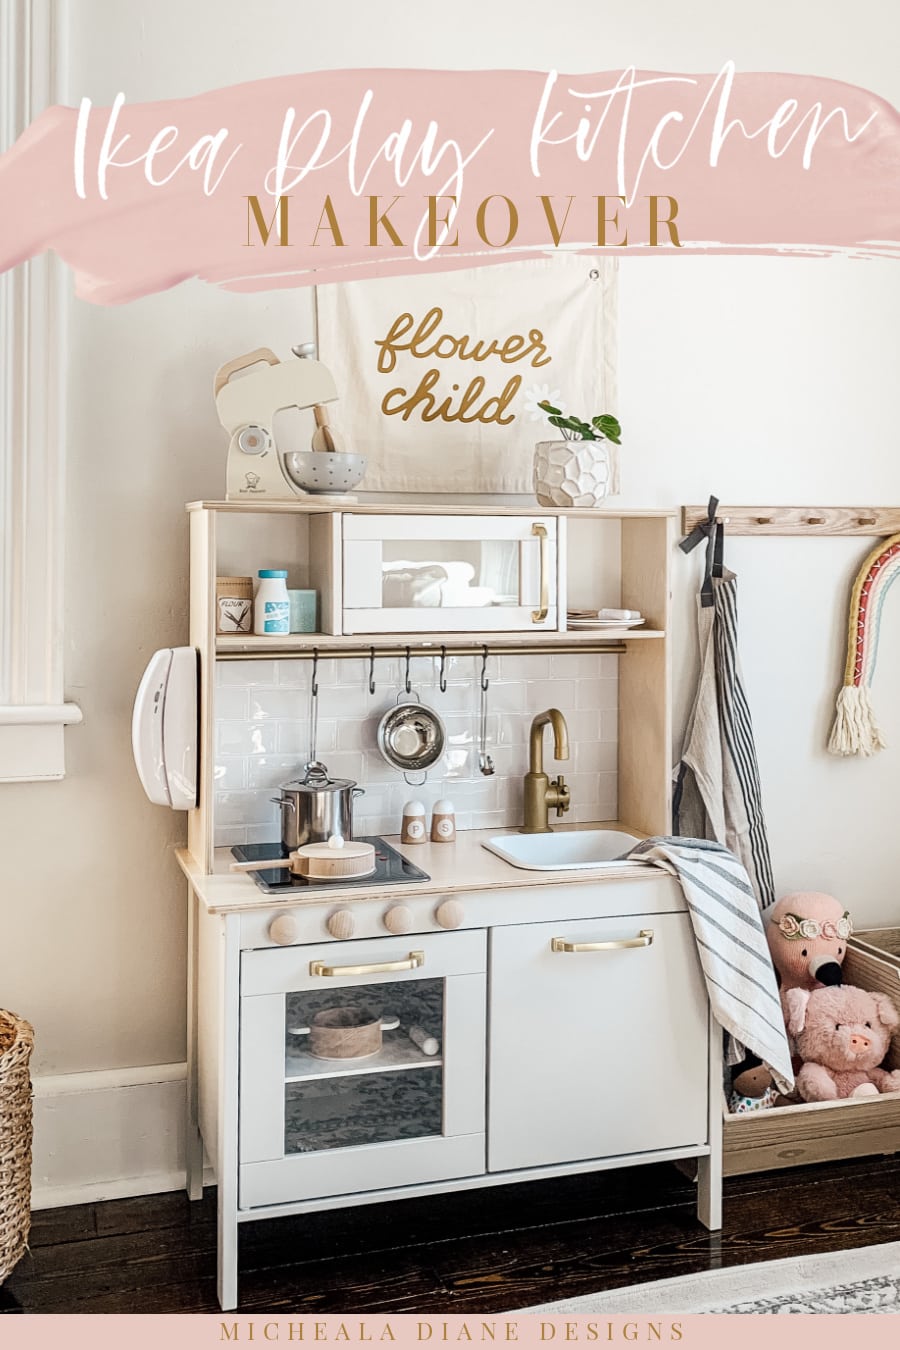
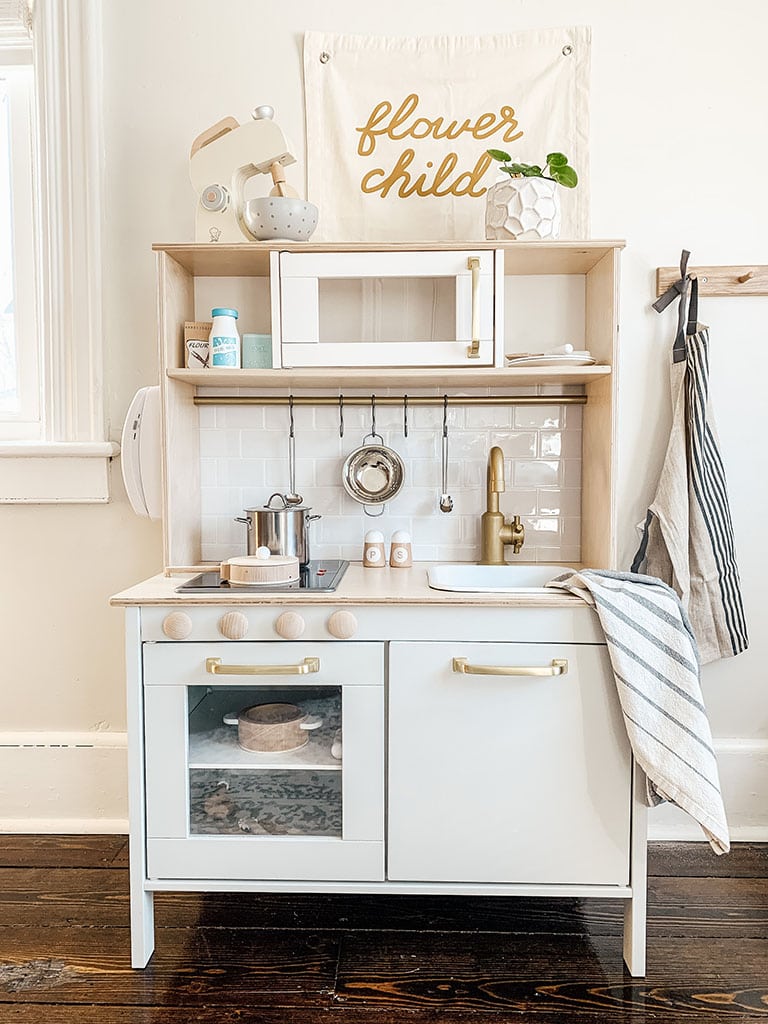
In this post I am sharing a step by step tutorial on how to give your Ikea play kitchen a makeover. This hack will give you that expensive play kitchen look for a fraction of the price.
If you have ever done a search for a neutral/wooden toddler kitchen you will see that the price can range anywhere from $300- $800 for a play kitchen! Although beautiful we couldn’t bring ourselves to spend that much on a toy, but I also didn’t want to budge on the overall aesthetic.
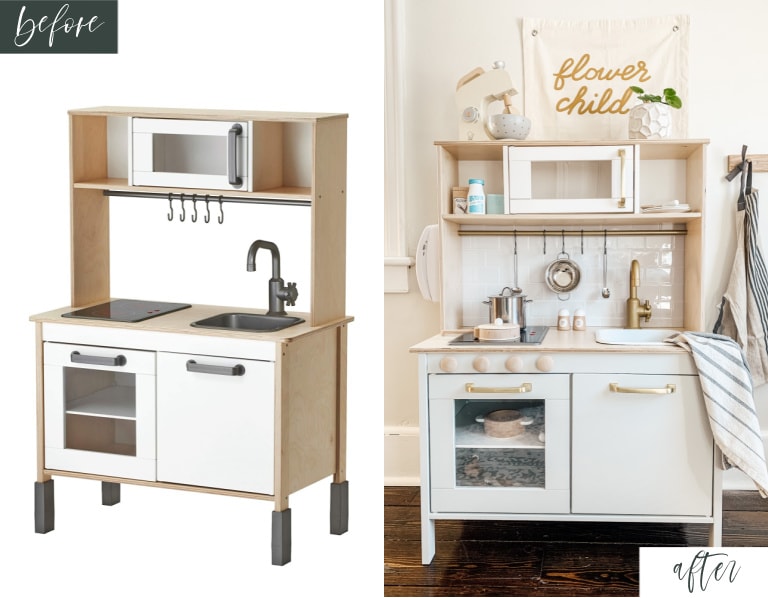
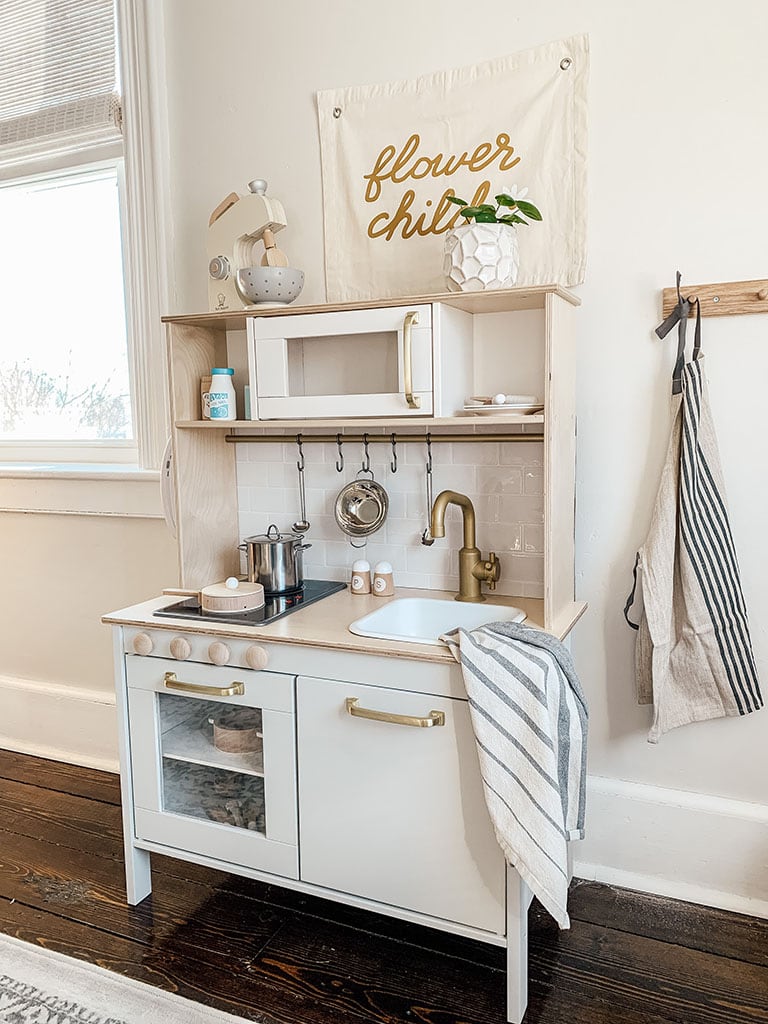
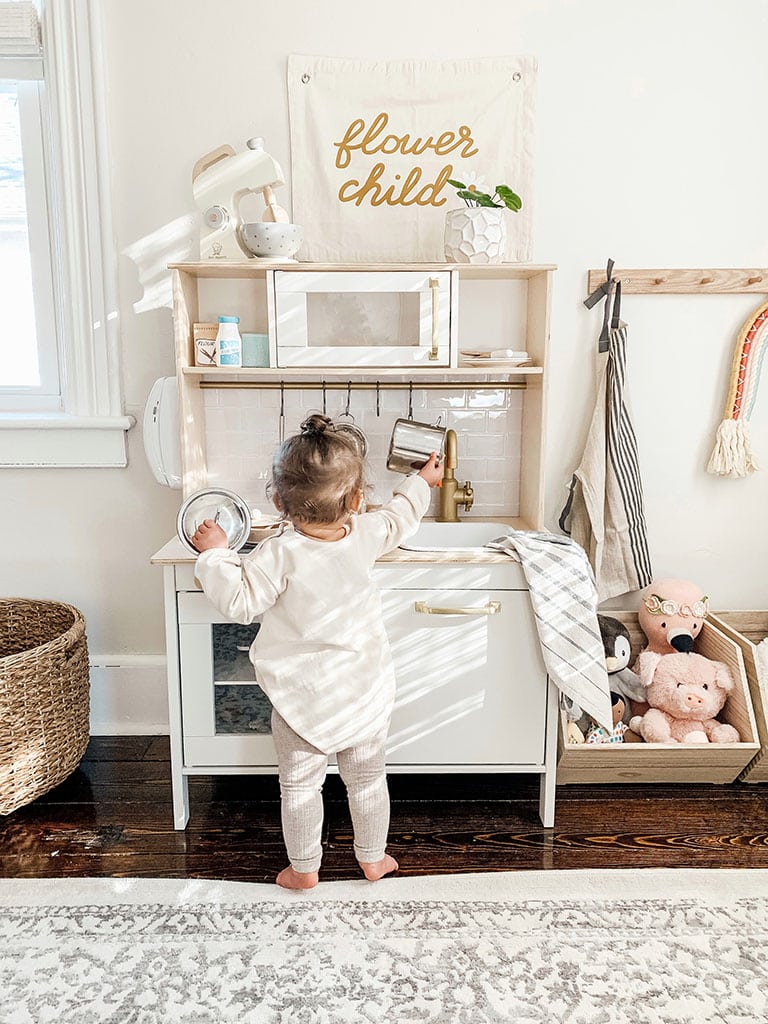
So we decided to go with the Ikea Duktig play kitchen and give it a complete makeover. The Ikea kitchen when purchased at the store is only $90. With a few changes, we were able to get the exact look we wanted for about $160 ( including the price of the kitchen).
In this post, I am sharing a step-by-step guide on how to give your Ikea play kitchen a makeover. We are so happy with how it came out and our little girl loves it.
I also want to note we gave her this kitchen at a year old. I was nervous that she may be too young but she absolutely loves it. It is the first thing she goes to in her playroom. At the end of the post, I share all her favorite play kitchen accessories.
Related: If you missed our neutral playroom reveal you can see the full post HERE.
Ikea Kitchen Hack
Before & After
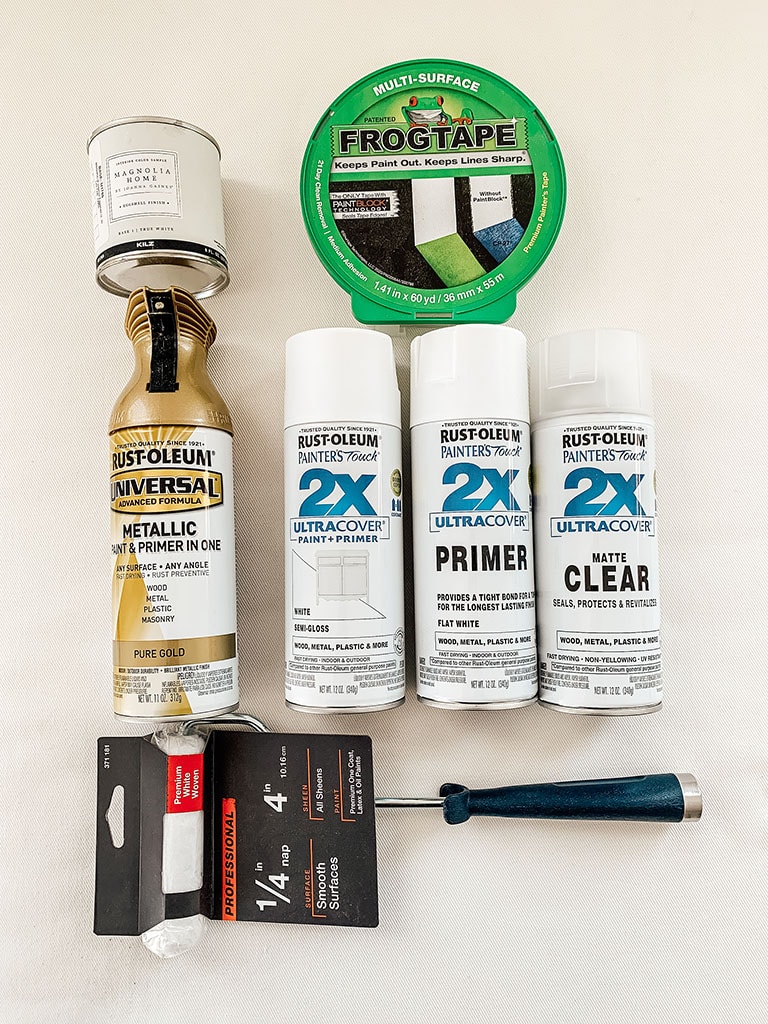
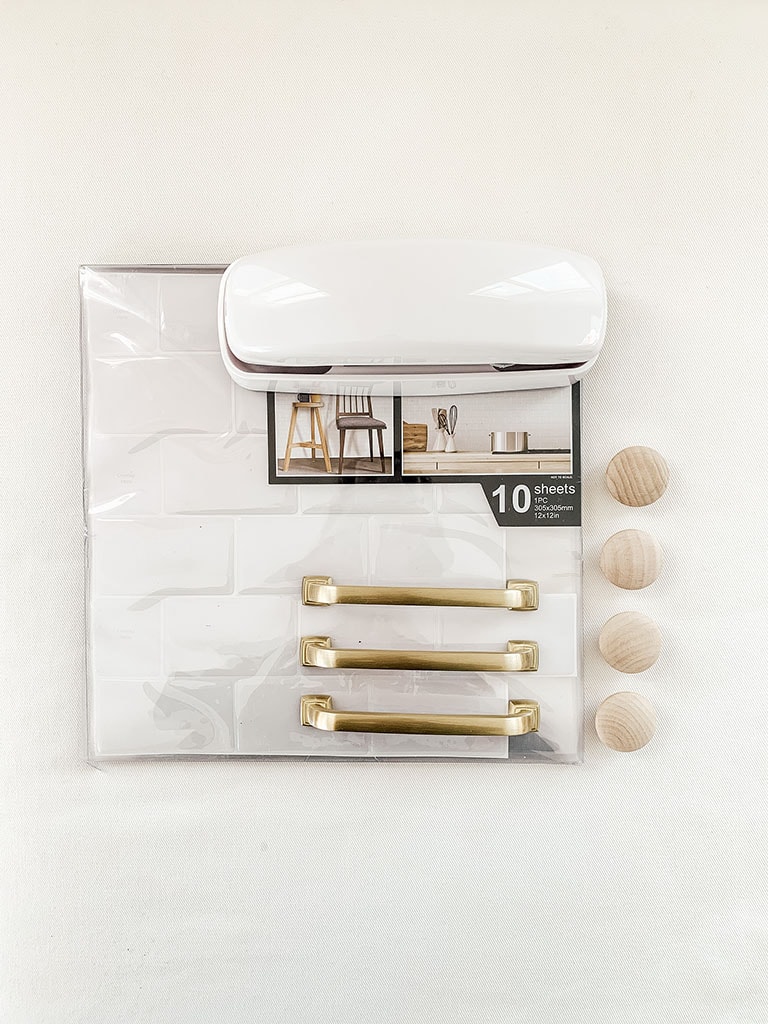
Materials List:
“Affiliate links provided for your convenience, please read my disclosure for more information.”
You can purchase the Ikea Duktig Play kitchen HERE or at your local Ikea store.
Tools Required

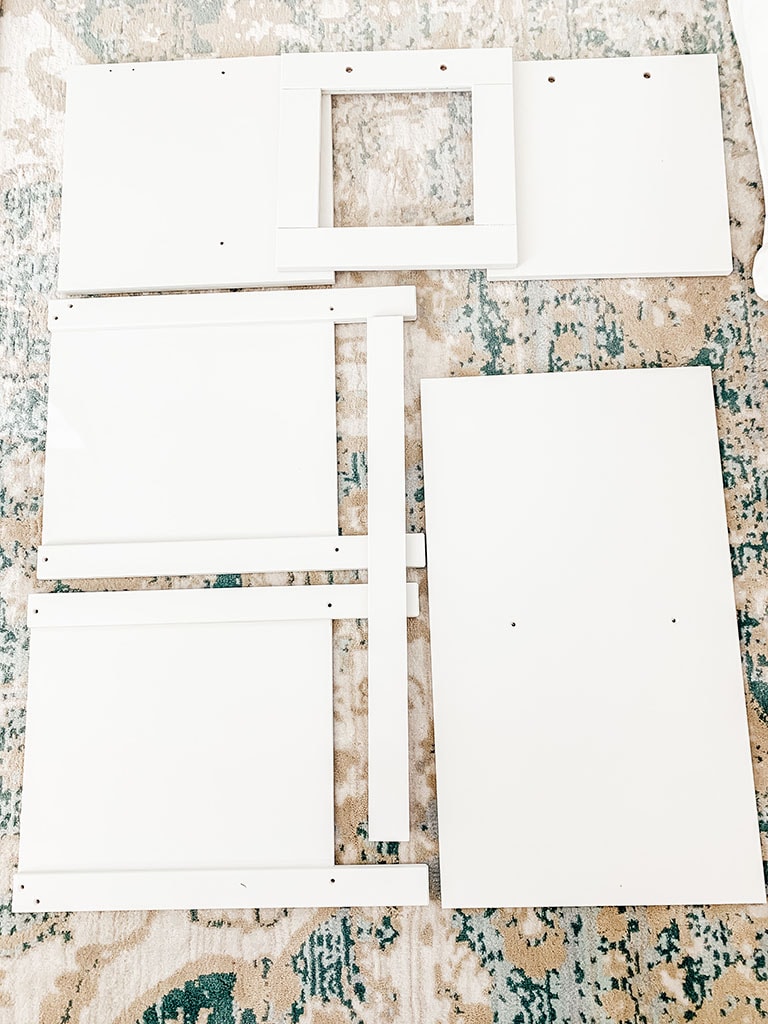
Step One: Get Organized
Like any DIY project getting organized is important, but when it comes to Ikea projects it’s even more important. The Ikea play kitchen comes with a lot of parts and pieces.
You will first want to read through the directions that come with the kitchen and start identifying all the pieces.
Once you have a handle on what parts go where you can then determine what parts of the kitchen you will want to paint. Make sure you identify which side needs paint. You will not need to paint the sides of the pieces that will not be seen on the outside. I recommend adding a small piece of painter’s tape on the side that will be painted.
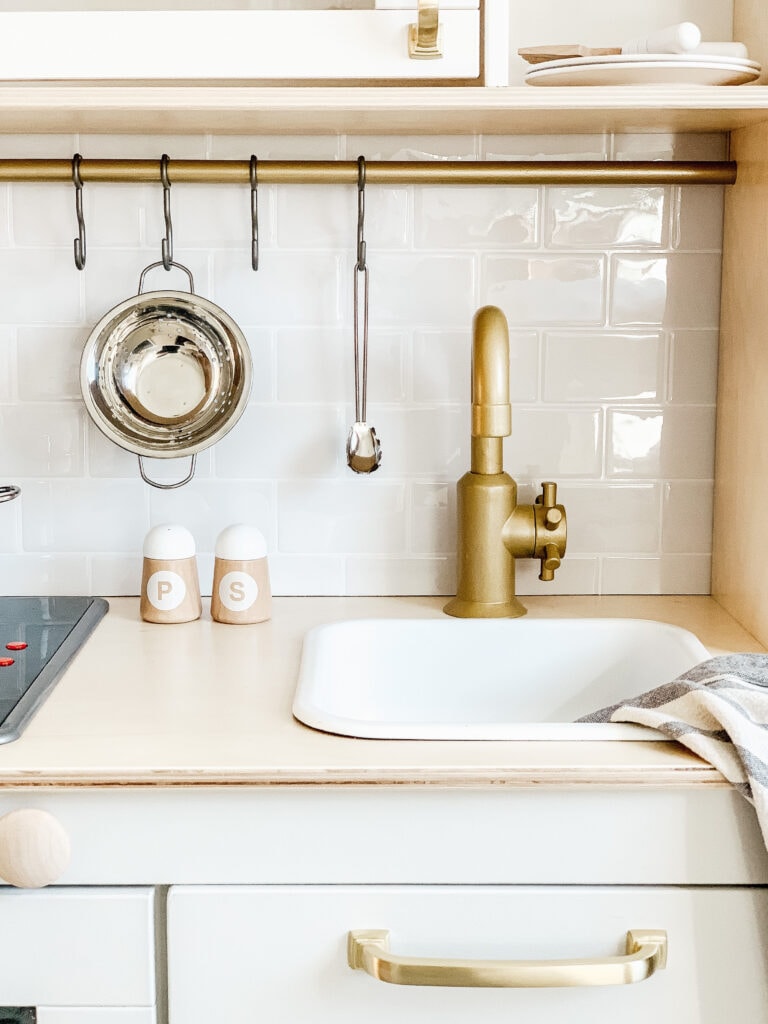
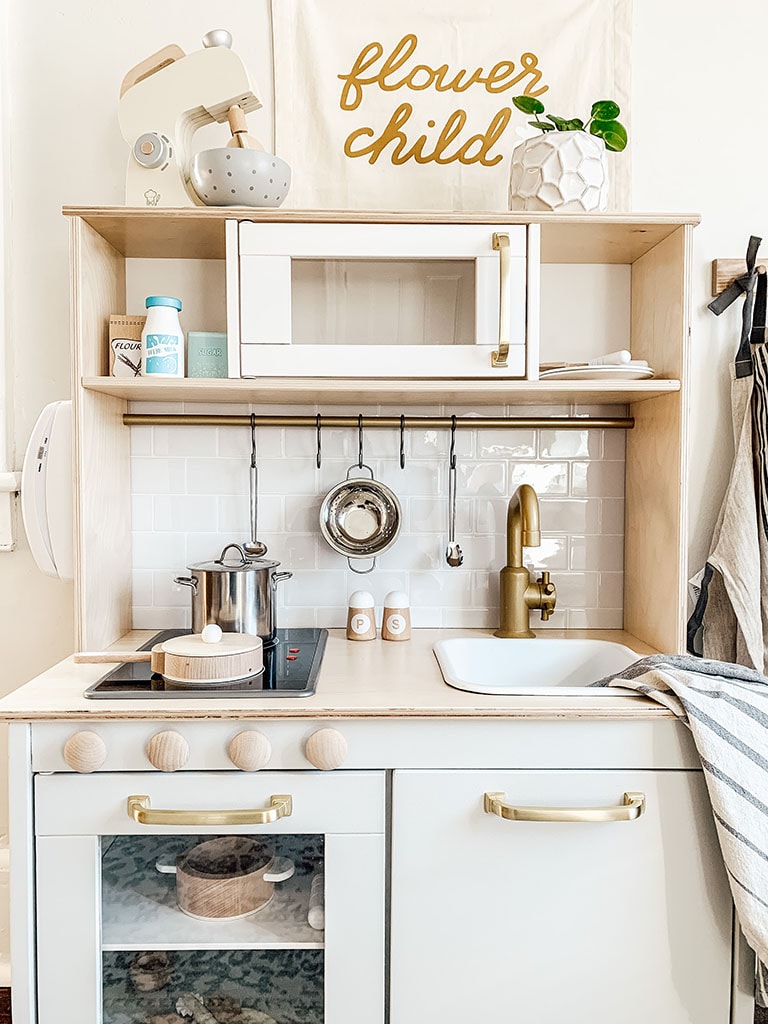
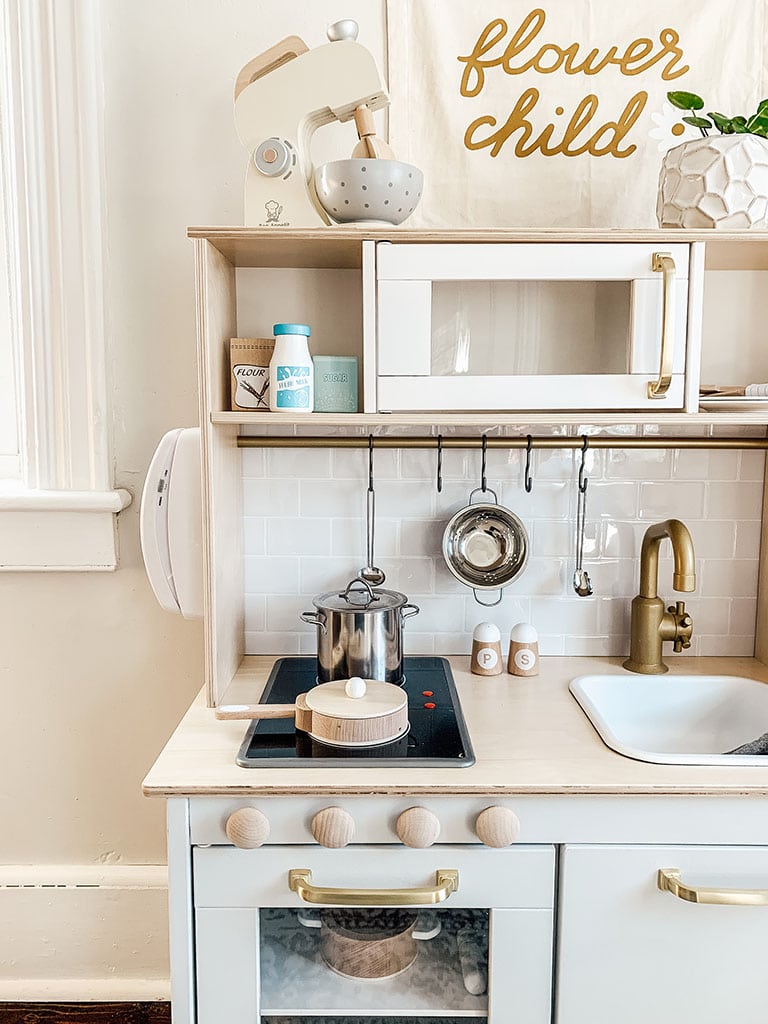
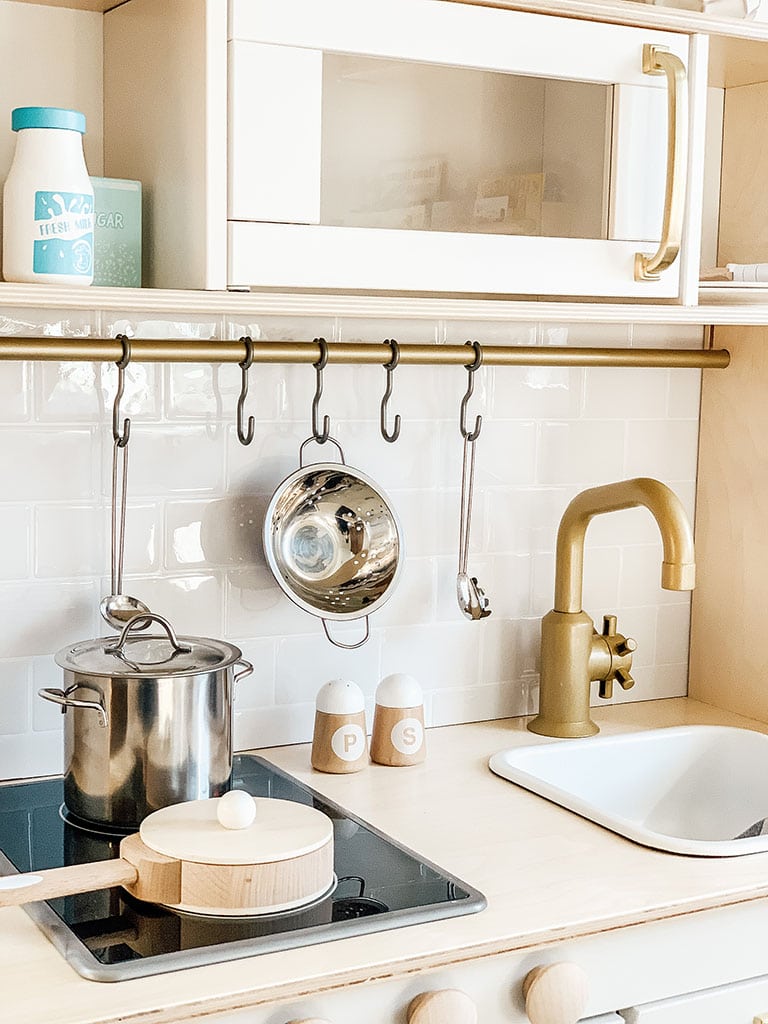
We decided to paint the lower cabinets of the kitchen, spray paint the sink, faucet, and hanging bar. We left all other elements as is.
There are so many creative ways to approach this kitchen design. I did pull some inspiration from others who have also done the Ikea play kitchen hack. This helped me determine exactly what parts I wanted to paint for our design and overall aesthetic.
Once you have a design plan and all your material it is time to paint!
Step Two: How to Paint Ikea Play Kitchen
How to Paint the Base Cabinets & Doors
The biggest part of this project is painting the base cabinets. We decided to go with a light gray paint color called Yarn by Magnolia Home. We happened to have some leftover paint from our home office project. I knew that it would be perfect for our neutral play kitchen design.
You will want to start by taping off the window on the oven door. This will come in handy when you paint but it also protects it while you are sanding.
There are seven pieces in the base cabinet assembly that will need to be sanded. You can use 150 grit sandpaper and lightly sand with an electric sander. This will take off the protective layer and allow the paint to adhere to the cabinets.
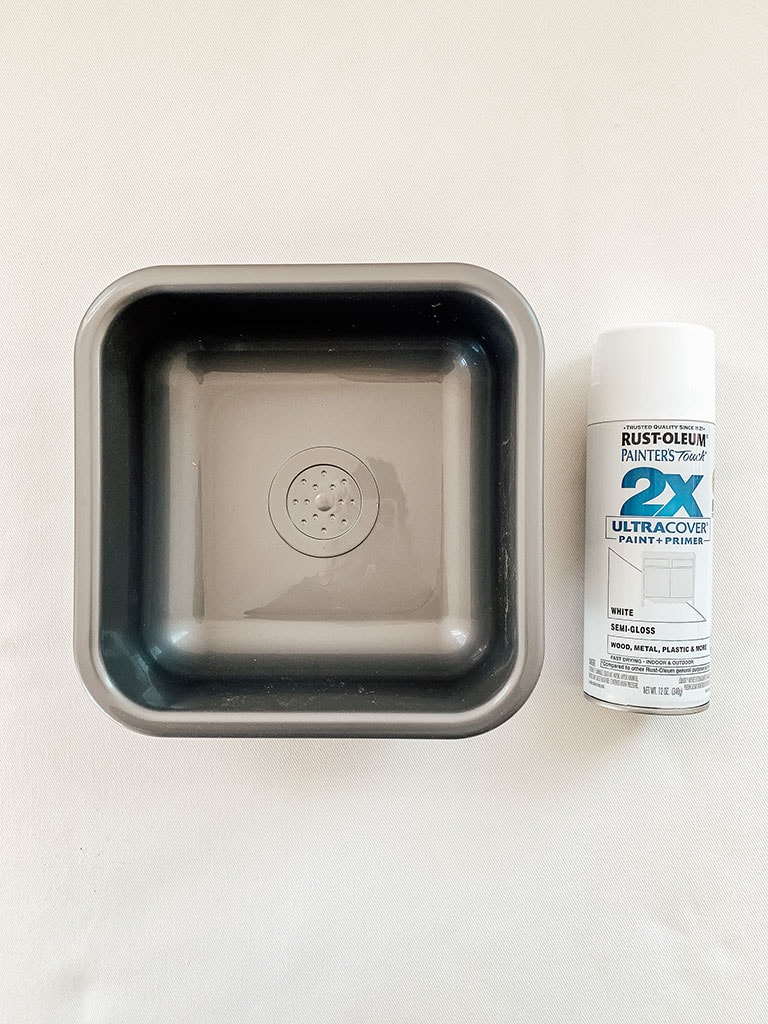
After you have sanded the pieces apply one coat of the RUST-OLEUM Painters Touch 2x Flat White Primer. Follow directions on the can. Once dry you can paint using a color of your choice.
We used these mini rollers and it made it really easy to apply the paint. We also recommend lighting hand sanding between paint layers using 220-400 grit sandpaper. This is not necessary but does give you a nice smooth finish.
We ended up using 3 coats of paint in total.
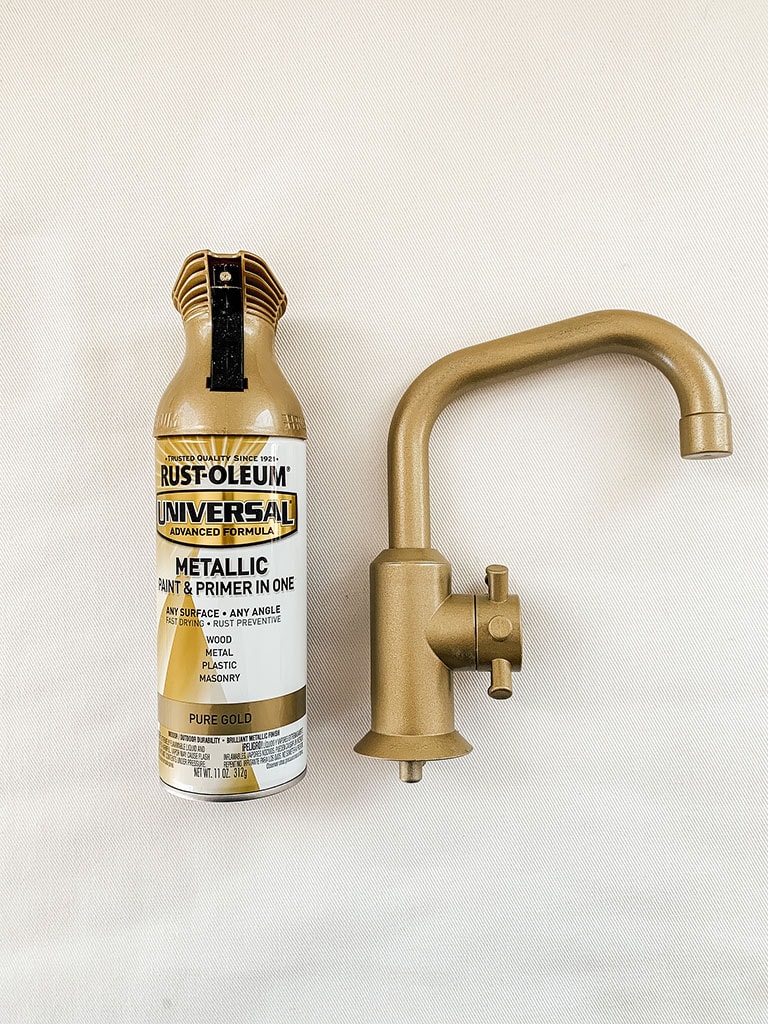
How to Paint the Faucet, Sink, Hardware
Next up is the faucet, sink, and hardware. We chose to spray paint the faucet and the hook bar gold using Rust-Oleum Metallic Pure Gold. We painted the sink white using Rust-Oleum Semi-Gloss White. And the feet we painted to match the cabinet color. You also have the option of painting the handles, but we decided to replace them altogether.
Regardless the steps below can be used for painting any of the plastic parts of the kitchen.
You will want to lightly sand each of the plastic pieces with 400 grit sandpaper. This allows the spray paint to adhere to the plastic.
After sanding we did 2 coats of the Rust-Oleum Painters Touch 2x Flat White Primer sanding between layers only if we saw uneven areas.
Once primed we added 2-3 coats of spray paint in the color of our choice.
The final step is adding 2-3 coats of the Rust-Oleum Matte Clear. This play kitchen is going to have a lot of traffic and touching and the clear coat provides a protective layer against chipping.
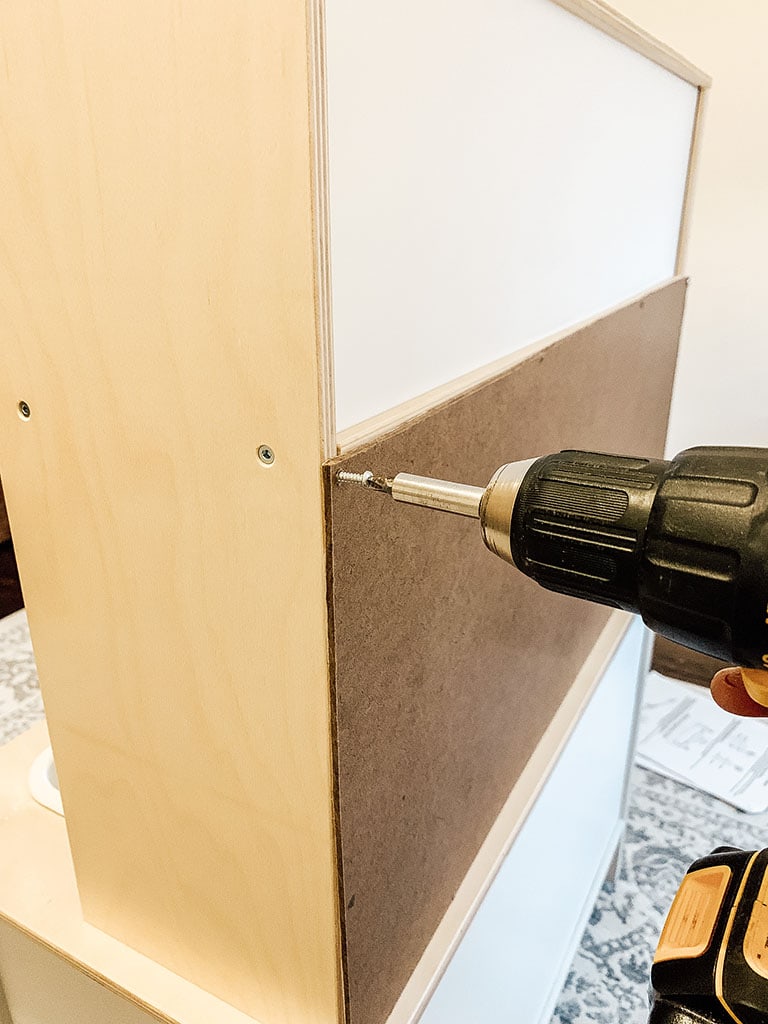
Step Three: Assemble Play Kitchen
Once you have all your parts and pieces painted it’s time to put everything together.
Follow the instructions provided by Ikea to assemble your kitchen. As with any Ikea piece, this does require a bit of patience. Overall though it is pretty straightforward.
One thing to note is that the sink just sits inside the cutout. If you have a toddler the chances are they will try and pull it out. The minute we introduced our girl to her new kitchen the first thing she did was pull out the sink.
We used command hanging strips to keep the sink in place, but I have also heard of people using super glue or under-mounting the sink.
We did not end up installing the feet. We did paint them but since our girl is still little keeping the feet off makes it the perfect height. We will add them back when needed.
We also did not install the handles that came with the kitchen. Up next I will share what we used instead.
Step Four: Ikea Play Kitchen Handles
Replace Existing Handles
The Ikea Duktig kitchen comes with three grey handles. One for the microwave and two for the bottom cabinets. Instead of spray painting them we decided to replace them with real handle pulls. This was one more element that made it feel like a real kitchen and I love this small detail.
I went with these satin brass pulls because they are a perfect match for the existing holes. If choosing different hardware be mindful of the center to center dimension. These are 5 inches.
Ikea Play Kitchen Oven Knobs
Another element that we decided to add that does not come with the play kitchen is oven knobs. I loved the look of wooden knobs, but there are many different variations that you can do for this detail if you want to add it. We ended up going with 1-½” round wood drawer knobs.
One thing that was important to us was that these knobs be functional. You could just glue them on but we wanted her to be able to turn the knobs.
The first step is to determine the location of each knob. We took a measurement of the oven door. Then we divided the space so that there would be equal spacing between all four knobs. Once you have the location you will want to drill a hole slightly larger than the screws that came with the wooden knobs.
In order to make the knobs turn you will want to use Thread Locker on the threads. You do this by applying the thread locker on the bottom of the screw. When you install them be sure to not fully tighten the knobs onto the cabinet. Let them dry for 24 hours and the knobs will spin without tightening
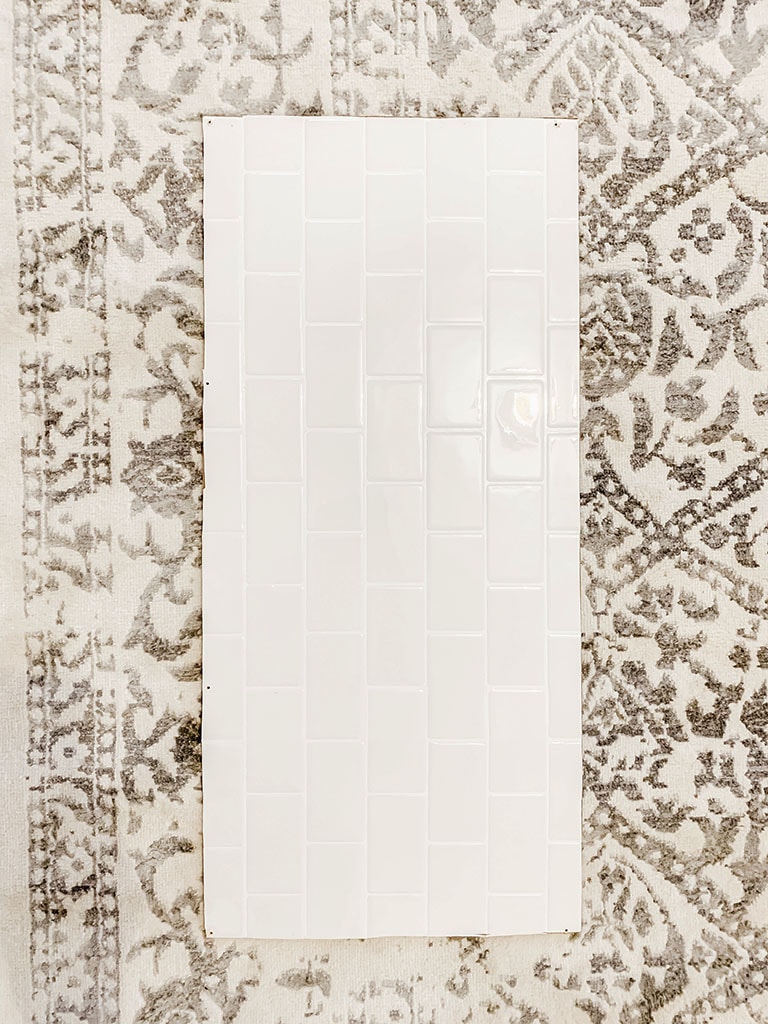
Step Five: Ikea Play Kitchen Backsplash
The last thing we did for our Ikea play kitchen makeover was installing the backsplash. You will need to measure the opening on the Ikea kitchen and cut a board to size. Ours ended up being 26.75 in x 12.5 in. We used an inexpensive hardboard. You can use any board you would like, but be sure to read the directions on the peel and stick tiles. They do have surface requirements.
Once you have the board you will want to apply your peel and stick tile. We went with a white subway tile with white grout. They came in a pack of ten, 12×12 sheets.
We ended up needing six sheets to cover the opening. It is just slightly taller than 12 inches so you end up using three full tiles and a small amount of the other three. The peel and stick tiles do have directions on the best way to lay them out.
The final step is to screw the board into the back of the kitchen.
Ikea Play Kitchen Accessories
White Phone | We installed this white house phone on the side of her kitchen. I removed the cord since it is a choking hazard, but she loves to push the buttons.
Pasta Pan Set | This set is adorable and comes with stainless steel pot, colander, pasta spoons, felted ravioli, and bow tie pasta.
Wooden Cooking & Eating Set | This come switch wooden pots and pans, cutlery, plates, spoons, spatula, and the cutest salt and pepper shaker.
Wooden Mixer Set | Our exact one is out of stock but this one is similar and comes with the mixer, bowl, sugar, flour, and eggs.
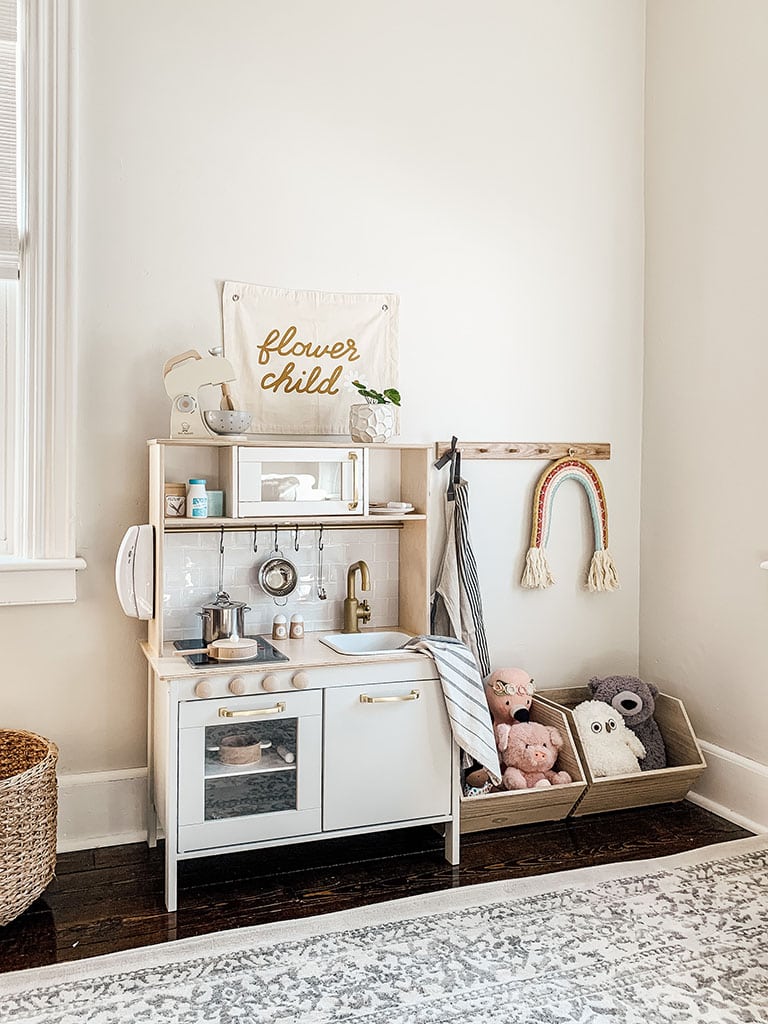
Flower Child Banner | I love this fun addition to her playroom and it fit in perfectly right above her kitchen.
What to Read Next:
Neutral Minimalist Playroom
DIY Magnetic Chalkboard House
Gender-Neutral Nursery Reveal
Want to save this for later? Post this Ikea Play Kitchen Makeover to your favorite Pinterest Board!